Get the latest tricks to install .NET Framework on your PC with screenshot help.You don't have to download the .NET Framework version 3.5 on your system.
Now-a-days almost all Games, new Software, 3rd party software require Microsoft .NET Framework which should be installed in your system. The required .NET Framework version might be different for different software and the most required .NET Framework version is 3.5 which come pre-installed in Windows 7. But if you are using Windows 8, or Windows 8.1 you might face a problem while trying to run a program which requires .NET Framework 3.5 version.
Windows 8 or windows 8.1 doesn’t come with .NET
Framework 3.5 version. It comes with the latest .NET Framework 4.5 version which
is preinstalled on your PC. Whenever you try to open a program requiring .NET
Framework 3.5, you get following message:

There are 2 options given to install the .NET
Framework version or to skip the installation. If you decide first option that
is to install it, Windows tries to connect to Internet to download the setup
files of .NET Framework 3.5. After proper connection you
will able to install the required 3.5 version. But this process is very much
difficult.
It is very strange that Windows 8 or windows8.1
contains .NET Framework 3.5 setup files in it but still windows service tries
to connect to internet. It would be better or easier if Windows 8 installs .NET
Framework 3.5 without internet connection.
If you try to download .NET Framework 3.5
offline setup file and then try to setup then it shows the below warning
massage:

If you don’t have internet connection or if you don’t
want to waste your data bandwidth for downloading the setup file, this is the Trick for you
Here are the steps to avoid the online
installation of .NET Framework 3.5 in Windows 8 or Windows 8.1.
Step 1. First you have to copy your operating
system which is installed on your system. That means if you have booted your PC from CD or pen drives then you need to copy that OS files in your hard drive.
Step2. If
the File contains in .iso format then you have to derive all sub-files. If you
are using the Windows 8 or Windows 8.1, then just open that files by “windows
explorer” or you can also derive by using “7-zip”, ”winzip”, “daemon tools”
etc. Now after getting all system files and folder copy them in a drive in your
PC. You have to remember the drive name
as well as the drive letter of that drive in which you have kept your OS file.
Step3. Now open command prompt now as
administrator. Press windows button type “cmd”. You can see “command prompt”.
Right click on it. You will get that screen.

Step4. Click
“run as administrator”.
Step5. Copy that code and paste on that black
screen field.
Before paste read the instruction properly.
Dism /online /enable-feature /featurename:NetFx3
/All /Source:F:\sources\sxs /LimitAccess
[**Do not try to paste by
using ctrl+ v, just right click and choose paste]
[** Here the code contains “/Source:F:\”,
here F is the drive letter where the OS files you have kept.]
After some time it will show the window below.
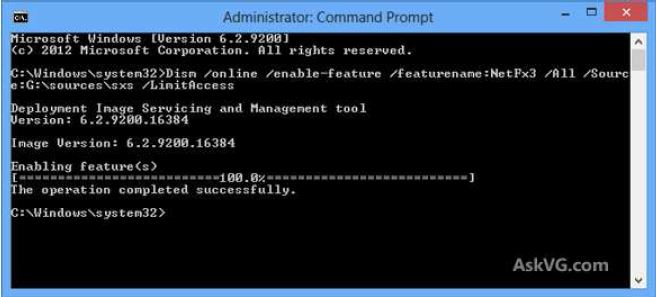
Congrats! You have successfully installed .NET
Framework 3.5 on your system.
Thank you for visiting my site. Keep visiting my
site for new updates.
No comments:
Post a Comment